

Multi-Band Compression
Waves C4 Multiband Compressor
The majority of the compressors we use in music production operate on what is known as the full-band principle, where the entire audio signal is processed via a single gain-control element. When gain reduction occurs, the whole signal level is reduced, just like turning down a volume control. Whenever a loud peak occurs it forces the compressor to act and the level of the whole signal is reduced until the loud event has passed. Multi-band compression isn’t specifically limited to use in mastering. The ability to focus on specific frequencies and control them, without effecting other frequencies, is what sets multi-band processors apart from the more basic single band models.
Multi-band compressors share similar parameters to single-band compressors. The operational techniques may differ from plug-in to plug-in, but once you have mastered the basics you should be able to use the compressor for various dynamic management situations.
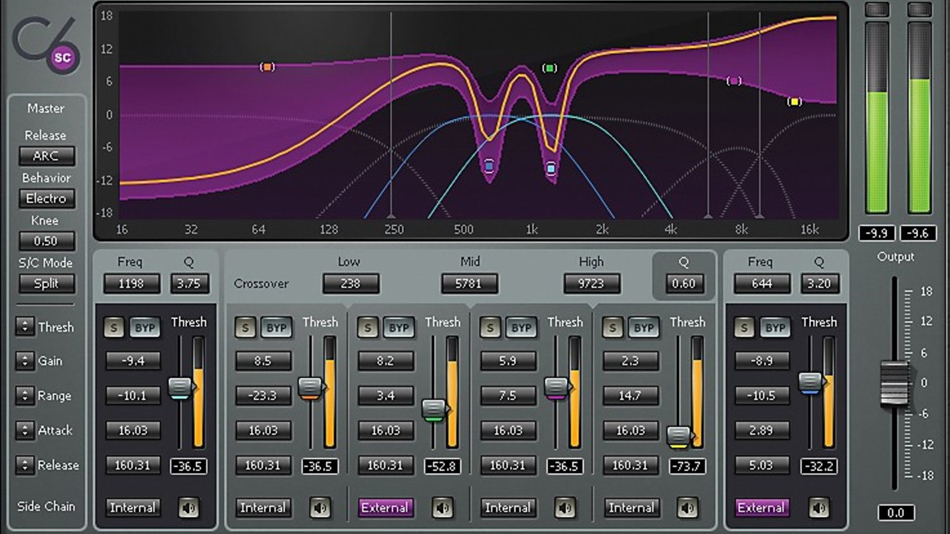
The Waves-C4 multi-band compressor is an excellent example of a mastering processor that can also enhance your mix, using techniques in achieving a very loud sounding mix. It’s cousin the C6 is an identical plugin but offers more features such as a key input link option and an extra parametric bandwidth for specialized circumstances. Though getting a loud sounding mix is an attractive attribute, is not ideal for all listening situations. I believe good music sounds better when the listener can notice and appreciate dynamics that may contribute to an empowering and emotional connection to a song. When I mix for the pop-rock genre, I try to have the choruses stand out more with their natural amplitude increase through additional instrumentation and extra accompanying vocal harmonies.
By using minimum transparent compression, I am able to achieve a slightly louder sounding mix but still retaining a sense of dynamics. In other genres such as hip-hop and hard rock, severe compression seems to be a must, for music in these genres, view loudness as a necessary component in maintaining an edge in the ongoing loudness trench warfare. I hope this phase of massive music compression comes to an early demise, for music should be appreciated as a commercial and aesthetic art, rather than who can be the best at massively compressing music. Thankfully artists are more aware these days and are not caught up in the insane world of psychopathic mastering engineers who view mastering “loud as possible” as a victorious war tactic.
Short Video on the Loudness War: http://www.youtube.com/watch?v=3Gmex_4hreQ
With a decent multi-band compressor strapped across a DAW master output, the engineer also has the ability to remove troublesome frequencies that compromise the fidelity of the sound. He will be able to manage chaotic low frequencies, lower the level of problem transient sounds, bring rogue guitars and effects into line and take the midrange bite out of heavily compressed vocals recorded with dynamic microphones. All this can take place with varying amounts of compression with each band can containing different attack and release times and compression ratios.
A common problem arising from this method of normal buss compression is that a loud snare drum (which generates mainly transient high frequencies), will trigger the compressor and consequently pull down the gain of everything else that happens to be passing through the compressor at the time, even though those other sounds might not need compressing.
If the compressor is acting on a snare drum, then the whole mix is regrettably being compressed and the other instruments such the bass and harmonic instruments will be compressed along with the snare drum.
Another consideration, which admittedly affects the designer more than the engineer, is that any form of equalization filter circuit introduces phase shifts, so great care has to be taken to ensure that when the bands are recombined, the optimal phase is restored.
Failure to do this can result in loss of clarity, in much the same way as you might experience when using a very cheap transistor parametric equalizer. The C4 has very well demonstrated excellent phase coherence in many of the various modes of dynamic management.
One way to mask this aspect of full-band compression is to set a slightly longer attack time so that transients can pass through cleanly before the gain reduction takes place, but clearly this does little to control peak levels, which is important when you’re working with digital systems that can’t tolerate overloads, however brief they are. A good approach is to follow the compressor with a fast-acting peak limiter to prevent overshoots or excess levels, which is very important in maintaining quality in digital systems.
The C4 Multiband compressor has 2 choices of compression release behavior with the Electro-mode offering slow release times at high compression ratios, and faster release when the compressor gets close to unity gain. The other mode is the Opto-mode, emulating the behavior of the Optical compressors like the LA-2. This mode offers fast release times with high gain reduction and slow release times when closer to unity gain. With the C4 the engineer can use average level compression and have one band focused in the frequency range that contains the transient peaks.
With the C4 you will notice that the plug-in’s central window is divided into four bandwidth sections. These represent different areas or better know as bandwidths of the overall frequency range. Most multiband compressors work between 20Hz – 20kHz, where the engineer can set the range that each frequency band covers.
The attack and release times on the C4 are already preset where the releases and attack times are longer in the low frequency range and are much faster in the higher frequency ranges. These times are determined by the fact that frequency wavelengths are longer in the lower ranges and transients that are mostly composed of higher frequencies determine that faster attack times are required. Each of these bands represents an individual compressor and has a full set of controls. All the usual controls are present; compression ratio, threshold, bypass, gain makeup, attack and release settings.
A nice addition is the ability to solo each bandwidth individually so the engineer can clearly focus in on the targeted frequencies. It can also work as an expander, but we will not look at that feature in this article.
With your frequency band set, your compressor will only act on the selected specific frequency range. This is really ideal for treating a particular instrument or unruly frequencies in your mix. Metering representation of most plug-ins will give you a clear idea of how much gain reduction and output is occurring in each band. This allows you to judge what sort of processing is taking place with a quick glance.
To concentrate in on each area, solo each band and identify the frequency area you want to deal with. Listen to the waveforms transient nature to identify how fast the attack time should be. Now set the compression so that a few dB of gain reduction is taking place when the instruments in that area are at their loudest. If you repeat this with each frequency band you should be able to establish a good amount of control that simply wasn’t there before. If the result of the compression alters the overall tonal balance unpleasantly, you can restore it by changing the gain makeup levels of the four compressor bands relative to each other. The C4 allows you to boost the level of the overall bandwidth that is being compressed in order to make up for the gain reduction that is occurring.
Crossover Frequency Points C4
With multiband compression it is apparent what bandwidths should be utilized in the setup. There can be some flexibility in the selected crossover frequency points for the actual roll off slopes used are gentle and not too severe. Also the overall entire frequency content of the whole music selection should also be factored in when deciding on the area of frequency content of the separate bands.
For example if the music is hard rock or hip-hop then the low frequency point would tend to be lower. If the music contains a lot of natural instruments like grand pianos and acoustic guitars then the range between 2khz-10khz could be altered up to 4khz-10khz. The best decision is usually an aesthetic choice by the engineer and the genre of music.
Low Frequency Bandwidth
On average I like to set up the crossover frequency in the 140hz – 160hz range where the default filter used is a shelf curve. Which means all frequency content below the set frequency is affected (140hz-160hz). This bandwidth targets the bass and instruments played in the lower registers.
When I’m working on a track where the bass end is lacking in weight, I may use a lower threshold and a higher ratio 4:1 to bring up the average bass level, but still use subtle low-ratio settings 2:1 for the music, mid-range and high end. This will even out the dynamics of the low frequency range, and then I can then turn up the overall level of the low frequency range and recombine its processing with the gentle compression of all the other bands.
Music Frequency Bandwidth
This range is where almost all the music fundamentals played on instruments reside other than the bass and the extreme low end of a large grand piano. A good starting frequency would be start at the bass crossover selected frequency (140hz-160hz) and go up into the frequency point between 2khz-2.5khz. This is the bandwidth that defines the “Hi-Fi” sound, where all the mids are sucked out. With pop-rock music this is the range where most of the tonal energy resides.
Midrange-High Frequency bandwidth.
This is the range where the frequency content is used to define rhythmic ideas and a sense of presence. Almost all instruments and vocals need careful dynamic management in this range with the goal of striking a good balance between rhythmic articulation and presence. It is also the area where harsh sounding transients reside and sibilance from vocals.
The mid-high range 2.5khz-10khz in a mastering situation is the area I tend to process the least. The engineer when enhancing this range might also need to add a de-esser to manage any sibilance that may be exacerbated from the compression. The 2.5khz-3.5khz area of the frequency spectrum is also where things can start to sound harsh and hostile at louder monitoring levels.
High Frequency Bandwidth
This is where an intimate sound of vocals and presence exists. Also it is a nice range for cymbals, string instruments and for creating an intimate idea from a singer projecting softly. A gentle overall compression in this range will produce what is known in the industry as an “Exciter”. The default filter used is set to a shelf curve.
If the engineer just restricts processing to above 10kHz, he can significantly enhance the sense of detail and air, without affecting the crucial mid-range and disturbing the natural reproduction of vocals and many acoustic instruments.
For a slight increase in a sense of loudness one way is to set a low threshold with a very low ratio of 2:1 on all bands. Now, instead of applying a lot of compression to signal peaks, you’ll find that a little compression is being applied to all but the quietest signals in all bands. This is a good way of adding density and energy to a mix that’s already well balanced, but it won’t help with managing transients in a poorly balanced music mix.
As a rule, the busier the music, the faster the release time you need to ensure the compressor’s unity gain resets itself between notes, but low frequencies tend to hang on longer than high frequencies, so you may need a longer release time at the bass end than in the music range and mid-range bands. As a starting point, setting twice the release time as for the music and mid-bands might be reasonable, though if you prefer to keep it simple, you’ll most likely get reasonable results by starting off with the attack and release times for all four bands set the same.
The musical range covers the majority of what we perceive as music in a mix, so this can be set up much like a full-range compressor. In other words, use a medium attack with a medium- short release time with a low ratio (2:1) so you don’t choke the energy out of the music.
Multi-band compressors can be just as useful in the mixing stage as they are in mastering. Obviously there are not a lot of situations in enhancing simple, monophonic sounds with a four-band processor, but groups of instruments can really benefit from this sort of compression.
With a multi-band compressor applied to your drum buss you can treat separate frequency bands. Low frequency drum energy can be compressed and then raised in output level without affecting the rhythmic area of your drum mix. This sort of treatment will also give your drum sound a cohesive solid quality in the low end that is often hard to achieve with EQ and single-band compressors.
This technique is not just limited to drums, and can work with any number of grouped instruments such as guitars, vocals or even synth lines. As long as the contained sounds have a defined, unique frequency then the multi-band compressor will be able to manage the sound. Heavy electric guitar parts at times produce ugly transient artifacts in the mid-range that can be challenging to listen too at louder levels. Removing some of the mid-range transients can benefit the overall tonality of the sound. Bass guitars performed with a pick at times can produce some nasty transients, where selected mid-range compression can reduce the pick sound form the overall bass sound.
Multi-band compression is also useful when a number of instruments have been bounced down to one track, where you have lost the ability to tweak the individual settings. When using loops from sample libraries or samples from recordings the engineer should find this essential in managing the individual components from the one track.
It’s worth remembering that when you’re using any kind of compression on your final master, it’s wise to aim for a ‘transparent’ result. This basically means you are aiming to solve any mix issues and/or enhancing a mix without it being apparent that there is any compression being applied.
This usually means opting for long attack and release times, low ratios and small amounts of gain reduction. The engineer might need a fast acting peak limiter after the multiband compression to manage dangerous transients. If you find yourself having to use very heavy settings to get the desired effect, you may want to look at the original mix and make changes. Of course, you may be looking for a very compressed sound as a creative effect, but this will be at the cost of your dynamic range.
Multi-band compression in broadcasting serves several purposes.
Firstly, by increasing the overall level of program material it makes it more audible in noisy environments such as driving, in the workplace, and so on. It also improves the useful coverage area for a given transmitter power, maximizing the potential audience numbers and justifying higher advertising rates.
Whereas most pop and rock music stations employ the full four-band mega-crush such as the almost total absence of dynamic range from BOB FM, more refined music stations tend to opt for a more subtle approach. The CBC classical music channel for example, tends only to employ three-band processing with relatively modest compression.
Try tuning through the top end of the FM spectrum and listen to a variety of local commercial radio stations where some stations have very distinctive characters, which quickly become recognizable in their goal of increasing a larger audience in a certain demographic.