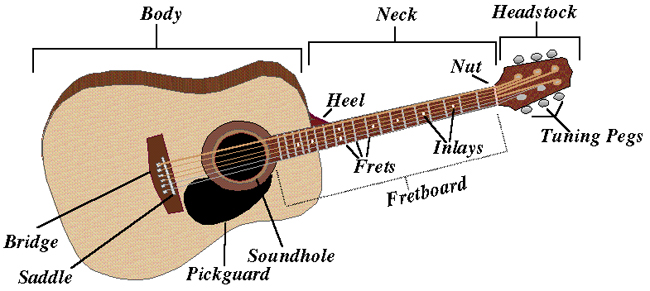

Producing Acoustic Guitar
The acoustic guitar is still very much in style these days, used in the many genres of folk, pop and rock music. While the acoustic guitar remains one of the most simplest instruments, it also remains one of the trickiest to get a superb sound on in the studio. It’s really not that challenging to record, as long as you follow a few basic guidelines.
The sound you obtain has a great deal to do with the competence of the player; the superior the player the better the sound! The best players will play a guitar that will costs thousands of dollars and are hand made by a guitar luthier.
If you are the player, first choose an appropriate type and gauge of string for the type of sound you desire and make sure that the guitar’s action is set up correctly so that it plays in tune and without buzzing.
Make sure the intonation is set up so the guitar plays in tune in any position on the neck. There are many different types of steel-cored wound string, all of which have slightly different properties. The most commonly used types on acoustic guitars are bronze, phosphor bronze and ocassionally nickel wound. An instrument with lighter gauge strings (11 to 53 ) will generally be easier to play, but the sound will be thinner and lower in volume and buzz a lot on the frets. On the other hand, very heavy strings (a set beginning with a 14- gauge high E) can sometimes sound bottom heavy and lacking in higher overtones on the wound strings. The best situation is usually the thickest set of strings that are comfortable enough for the guitarist to play. Start with medium gauge strings which will give you a very decent sound to start with (13 to 56).
The size of the acoustic guitar has a lot to do with the frequency range that it projects. The bigger the guitar, the more low end will be generated. These guitars are most effective with strumming chords in the open chord position often associated with country and folk music. These “jumbo” guitars are normally strung with medium to heavy gauge strings that are capable of producing more resonance due to the larger amount of wood that will resonate sympathetically. A medium size guitar will sound tighter and project the sound more quickly, which makes it great for soloing.
There is also the nylon-string guitar or better known as the classical guitar where the top three strings are made of nylon. This type of guitar produces a mellow and warm sound. It obviously does not generate the same amount of mid-range and high frequencies that steel-string guitars project. Nylon guitars are becoming more popular in pop music due to their capability to produce harmonic content in a frequency range that will not negatively affect the presence of the lead vocal sound. A great example of this is in the music of “Sting”. In a song like “Fields Of Gold” the nylon guitar can be mixed tighter to the lead vocal for it is not encroaching in the presence frequency range of the lead vocal sound. If “Sting” were to use a steel-string guitar instead, he would have to lower the overall level of the guitar because the high frequencies produced by the steel-string guitar would compromise the lead vocal presence (5Khz-12khz).
When a recording situation like this occurs, you would then have to lower the level of the guitar, where it would then distintctly separate the vocal’s melodic content sound from the harmonic accompaniment provided by the guitar, which is not desirable for pop music.
The 12-string guitar is the grand piano of the acoustic guitar family. Usually played in a strumming fashion with a light-medium pick and with chords in open positions. The 12-string guitar works most effectively by itself or with little accompaniment for it takes up a lot of the frequency bandwidth in the musical range. If you already have a basic 6-string performance and you feel you need an additional brighter guitar sound, overdub the same guitar but change the G and D strings with lighter gauge strings and tune them up an octave (Nashville tuning). The Nashville tuned acoustic guitar is a lot easier to play than a 12 string.
If the guitarist is using a pick, it is always worth trying various picks of different thicknesses. With strumming you will tend to get a more even sound with a medium to light gauge pick. A light-medium pick is suggested if your production needs mainly a rhythmic performance instead of a melodic dynamic performance. With soloing, a thick or medium gauge pick works best for incorporating dynamics and producing a melodic/rhythmic idea.
Another thing to consider is that the sound of acoustic guitar will depend a great deal on the environment in which the instrument is recorded in. Acoustic guitars thrive in live sounding studios, where early reflections and reverb time, can elongate the musical tonality of the guitar and create a sense of dimension. While artificial reverb can be used to revitalize the sound of a dead room, getting a realistic natural sound always produces better results, and if necessary, you can later add artificial reverb. To get a more live sound out of your room, try to position the guitarist so that the instrument is played close to reflective surfaces like hard floors, doors and solid furniture. If there is carpeting on the floor of your recording room try placing a sheet of plywood on the floor and get the guitar player the take off his/her shoes. Be prepared to have an additional pair of socks in case of gross air pollution.
Most studios should have a broad range of microphones to choose from, however there are very few dynamic microphones capable of doing justice to the acoustic guitar. Dynamic microphones will work if it is a live show for they are cardiod in their pickup pattern which can better control feedback.
It is best to use a condenser microphone(s) for its greater high- frequency accuracy, and usually ones with an omni polar pattern for a more of an even frequency response and not prone to proximity effect. If the stuio/room is too live sounding you might need to use a cardioid pattern to minimize the ambience, but remember to not compromise the overall quality of the guitar sound from adding potentially poor sounding characteristics of the studio/room.
Capturing a natural sonic balance from the guitar is incredibly valuable. There are different sounds coming from different places on the guitar that are important in contributing to an overall realistic natural sound. If a microphone is used too close to the guitar, the direct sound from that part of the guitar will dominate the sound over other parts of the instrument and not capture any ambience. You risk picking up only a part of the instrument when what you’re really after is an overall holistic sound of the entire guitar. The opposite can occur if your microphone is too far away from the guitar, where you end up with a lot of room ambience, leaving the original sound distant and unfocused.
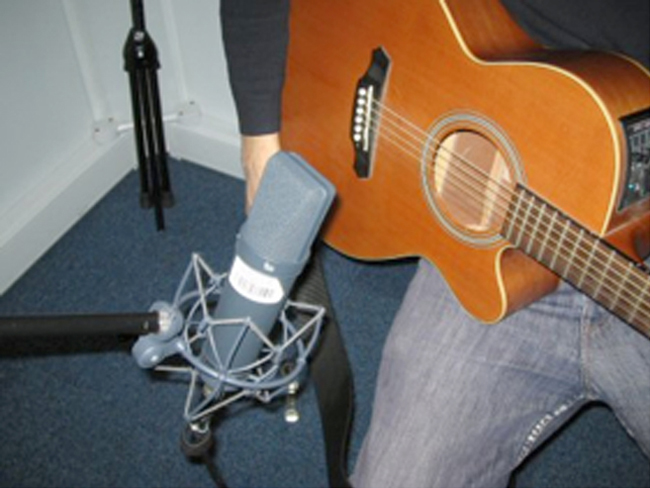
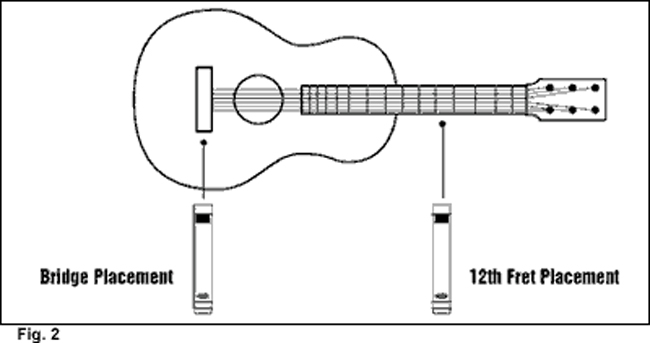
As for the specifics of microhone placement, position your ear as if it were the microphone while somebody else is playing the guitar. Move your ear around to find the “sweet spot”. A common approach is to set up the microhone around “6in-8in” from the guitar, with the capsule aimed between the sound hole and where the neck joins the body (14th fret). This will usually produce an overall well integrated sound. The levels of direct and ambient reflected sound will be about right and the sound hole’s contribution will be managable for the microphone doesn’t point directly at it. If you need more low frequency content, move the microphone position closer to the sound hole. If you need a brighter sound move the microphone closer to the 12th fret. This is where the first series of harmonic overtones originate that contribute more high-frequency content to the overall guitar sound.
If you have a pair of enclosed headphones that are very accurate to a reference point that you have established, you can easily experiment with tweaking the microhone placement while listening for the best pickup position in your headphones.
If you find an inspiring sound in this manner, remember to check the sound quality on your monitors before committing yourself to recording. If you find a good position but feel the sound is too dead, try switching the pattern to omni and if the opposite occurs where the guitar sounds too ambient, switch the omni pattern to cardioid. If you are working with a professional studio musician they will most likely have a custom-made guitar. Ask them where the “sweet-spot” is on their guitar for the performance you require.
Finding the Sweet Spot with One Microphone
If the guitar player is soloing and moving up and fown the neck try placing the microphone closer to the sound hole to acheive a fuller sound from the guitar. This will compensate for the lack of low-end that the guitar generates when used in a soloing fashion.
Most players will use a medium to heavy thick pick to solo with.
A guitar with a built-in pickup used along with a microphone will undoubtedly generate a decent sound but could generate phase problems between the timing of the pickup signal and the microphone signal. Experiment with moving the mic closer and further away from the guitar. This will affect the phase relationship of the two sound sources. Another approach is to sync the waveforms of the microphone and the direct pickup sound by readjusting one of the waveforms in Pro-Tools by a few samples or milliseconds. Since the player is most likely listening to the microphone pick up, it might be best to delay the D.I. sound until the two waveforms sync up and are in phase. If you do plan to use both signals in the mix, have the player first tap the body of the guitar in order to produce a transient with his pick before you start recording. By doing this, it will be much easier to sync up the two waveforms because you have a transient waveforms to sync with.
If you are cutting a track in a studio with drums try using the direct pickup only and replace the performance with an microphone pickup later in an overdubbing session. If you chose to use the bed track acoustic then use both signals and try to get the natural sounding high end from the microphone and the body of the sound from the direct pickup. Even though direct pickups on acoustic guitars have come a long way in quality, I have yet to discover one that sounds as good as a fantastic microphone pickup.
Stereo Microphone Pickup
Stereo miking works well for some situations where the acoustic guitar’s sound quality will be playing a major role in the final production. The Coincident “X-Y” technique is good but I feel it still falls short due to its lack of direct “on axis” sound in capturing the very top end of the the acoustic. It will provide you with more of a large cardioid pickup sound but with less high-end than you would get with a single microphone pointed directly on axis.
Make sure both mics are Identical pencil condensers, the same model and positioned the same distance from the guitar. The stereo “Rode NT4” microphone is very affordable for this application.
The legendary acoustic guitarist “Don Ross” uses the NT4 and usually adds a little top end to both channels equally.
Coincidental (X-Y) Microphone Technique
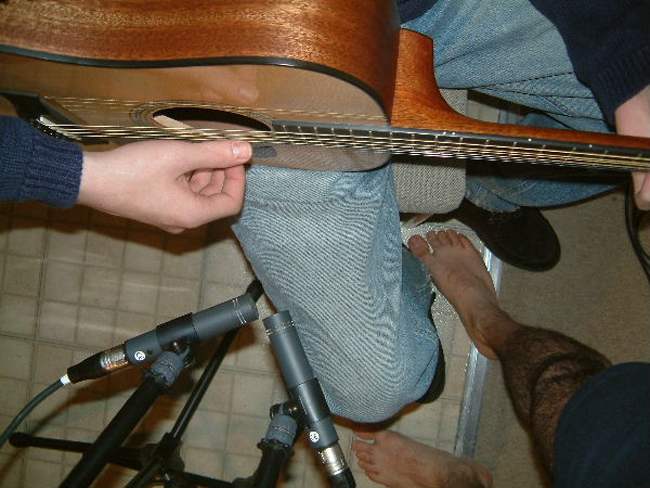
Some engineers will start with a stereo pickup with two microphines where one microphone will be positioned at the 12th fret and the other microphone over the saddle. This provides an etremely wide stereo pickup and is a suitable starting point. Some engineers will start there and slowly move both microphones in towards the sound hole to capture an ideal sound. I usually start with placing a microphone over the 14th fret and another just slightly off-centre from the sound hole, giving me control of the various sounds produced by the guitar and a decent stereo sound. The stereo sound will depend on how far you pan the two microphones in your mix, and because we live in digital delivery system, you don’t really need to worry about any phasing problems that often occurred when vynyl records were mastered.
Starting Point for Stereo Microphone Pickup
As with any studio recording, the makeup of the cue mix you feed to the guitarist will be extremely important, so be prepared to take a little time in preparing the headphone mix given the sensitivity of the microphones customarily used in acoustic guitar recording, for it’s easy to pick up annoying leakage from the headphones. Solo the microphone(s) to check for leakage and if there’s a lot of leakage coming through (from a click track, in particular) then consider turning down the overall headphone mix level or using a different pair of headphones. Closed headphone models are obviously best in this application and also reduce the possibility of feedback.
Recording acoustic guitar will usually benefit from a little processing. This should be kept to a minimum while recording, so that you leave your options open for the mix, it’s always safer to leave EQ and dynamic processing until the mixing stage.
Equalization
Equalization of the acoustic guitar is very common but should be used subtly. The first thing to do is roll off some “boominess” bass that can occur with a condenser mic set to cardiod pickup. This will also prevent the compressor from working inaccurately and maintaining an even harmonic balance for further processsing.
Rolling off low end can make a big difference in your production; for example, if other instruments in a pop/rock production have strong low mid-range or low frequency content, the acoustic guitar’s prouduction role might benefit if you you lower the amplitude of the low low end up to as high as 200hz and focus more on the musical and higher harmonic content of the acoustic guitar.
Most acoustic guitars performing in a strumming or finger picking style can use a mid-range and/or high frequency boost to enhance the rhythmic idea of the performance. With high mid-range use a wide Q (0.8) centred between 5khz-10khz. Try to avoid the low mid-range area of 2khz-5khz, for this is the mid-range area of electric guitars that you might need to enhance especially if an electric guitar is providing a rhythmic idea. If the production can afford to have an acoustic guitar play a major role in the production, the frequency presence area of the high-end can be boosted, with an EQ shelving boost starting from 8khz-10khz, which will produce a silky top-end sound. If you need musical body and tonality of the harmonic fundamentals, boost in the 300hz-800hz range with a medium to narrow Q. With acoustic solos you might need to enhance the low end between 100hz-200hz to add more body to the performance especially if the guitarist is soloing high up on the neck.
There will be situations where open chords are performed where the low end is not consistently even with the rest of the higher frequency content of the guitar. For example going from a Gmaj to an Emin chord often produces more low end on the Emin chord because of the open low E string. This is where a multiband compressor is useful where the compressor can focus only on compressing and evening out the low end of the guitar, especially if it is a jumbo sized guitar with heavy gauge strings.
Compression
With compression for a strumming guitar, a ratio of 3:1 – 4:1, a medium attack and medium release time should be applied. What you’re trying to do is even out the dynamics of the harmonic content of the chord changes without effecting the rhythmic idea.
The transient sound of strumming identifies the rhythmic part of the performance, so allow the transient nature of the sound to pass through the compressor unaffected through the application of a slow attack time.
If the attack time is too quick it might create the illusion that the guitar player is playing behind the beat and also reduce the rhythmic idea the player is trying to project. With a little mid-range EQ with this type of compression, you will establish that the guitar performance as rhythmic in nature. If you wanted the guitar as a musical part, compress with very fast attack and release times, lessen the mid- range and boost in the 200hz-800hz range. With these settings, the dynamics will be evened out and the harmonic idea will be more pronounced than the rhythmic idea. For soloing you might need to limit the transients slightly and EQ for presence/musical content. Compress with fast attack time and fast-medium release times to control the dynamics of the melodic idea. Remember not to over do it with dynamic processing on lead parts for it needs to still project a dynamic musical idea.
Creating Dimension
If the guitar performance is continuous strumming, there will most likely be no need for reverb. Reverb may be needed if the recording was made in a small room or dead studio to create a live sounding environment where the reverb time should be set with a decay time of less than 1.0sec. A mono recording can also be given a sense of space and width by adding stereo reverb. Ambience settings with pronounced early reflections are particularly effective in adding life and realism to a dead sounding acoustic guitar.
With strumming use a short pre-delay of 20ms-30ms and a reverb set with a 1.0sec decay time. You want to keep the reverb time short so the performance does not become harmonically confusing sounding. With a guitar solo use a pre-delay of 60ms-100ms with a warm reverb using a duller sounding decay time of between 2.0sec-3.0 sec. With longer reverb times you will elongate the melodic idea of the perormance. With longer pre-delay settings you can create a more intimate sound occurring in a nice sounding environment. For a soloing performance the concept of applying smooth reverb would be similar to using the sustain pedal on a piano.
If the performance is very fast, use reverb subtly, and if the performance is slow and melodic use the reverb to elongate a melodic idea. De-ess the send to the reverb if there is a lot of high squeaks and finger noise coming from the guitar.