
Dynamic Management-Audio Compression
Dynamic management in music has been often used in pop-rock music since the 1950’s. Phil Spector used compression generously in his famous “Wall Of Sound” productions. The main goal was to compress the dynamics of the backing music and the vocals independently so the overall production sounded loud and even in amplitude. This trend continued into the 60’s and was influential in the sound of “The British Invasion”. It was only in the early 70’s with the arrival of progressive rock and the “LA” sound that compression was used modestly in music productions, for intentional and appropriate use of dynamics were critical to bands like Steely Dan and Pink Floyd.
With the introduction of “digital” compression/limiting, the sound and quality of music has changed dramatically. Used properly, digital dynamic management works extremely well, but when it’s overdone? Yikes! In this lecture I am going to focus on transparent dynamic management and also be looking at the creative use of compression, where extreme compression can be used for a designed purpose.
I personally view audio compression as having various distinct roles in music productions. One role is for the compression to sound virtually inaudible or at least not very noticeable when inserted over an audio signal while providing reasonable dynamic management. Another other role is to create an audio effect where compression is used to generate a significantly altered sound of a signal and it is definitely obvious when heard. The main part of this article will look at how to use compression to enhance a rhythmic, melodic and/or harmonic role in a music production.
Dynamic Management
Dynamic management is achieved primarily by audio compression and limiting. You could also include audio expanding and audio gating, but that topic will be addressed in an additional lecture.
The dynamic range of a signal is altered to a lesser value, where the compressor reduces the amplitude of the louder levels. A lead vocal, which once had a dynamic range of 65db, is now 50db after compression. Once compressed, the engineer usually then turns up the output level-post compression back to unity gain, creating the illusion that the compressed signal is perceived as being overall louder than the uncompressed signal. It is a process that basically lowers the amplitude peaks and turns up the lower levels of a signal through raising the output gain back to unity gain. The peak levels are now the same as the uncompressed signal, but the lower levels have been raised. Some models have an auto-make up gain control that automatically increases the output level instead of the engineer performing it.
The aim of this lecture is to understand the process in how to utilize attack and release times in enhancing the harmonic, melodic and rhythmic elements of music.
Basic Audio Compression and Limiting
What often is not addressed when compressing a signal is the use of attack times and release times. A basic understanding in the use of these 2 parameters can improve the audibility of the signal, not affect the signal at all and/or enhance a musical role the engineer desires. If not used properly, the quality of the signal can deteriorate or not even be affected at all.
For example; if there are several transients in the signal, a fast attack time is needed to grab the peaks so the signal will not distort the final mix output level. The attack time also needs to be fast so radio limiting does not affect the overall volume of your mix when heard on the air. If the attack is too slow, the transients will not be compressed for the transients will go through the compression process unaffected. If the release time is too fast the compression will introduce half-cycle distortion on low frequencies that are very undesirable. Fast release times can also create the well known “pumping and breathing” sound.
In most recording, engineers tend to use medium attack and release time settings with ratios no higher than 4:1. Most of the time, the engineer is looking for moderate level control with average loudness with reasonable gain reduction. With standard compressors, engineers prefer compression that is smooth, fairly transparent and true to the sound’s fidelity. The engineer is utilizing dynamic management for a natural sound where the compression sounds transparent and retains most of its internal dynamic range properties.
Some engineer’s may opt for more severe and noticeable compression for a more “controlled” or tight sound. This type of compression is mainly used to create a noticeable effect in a mix. This usually calls for a compressor set with a fast attack and fast release time, higher ratios and lower threshold with serious gain reduction.
With today’s technology in digital recording, an engineer can select a recording format that can offer excellent sound quality without objectionable analog tape noise and distortion. When the industry only had analog tape recording, the engineer in many situations had to utilize dynamic management through compression and limiting to prevent tape distortion and potential tape hiss problems in the final mix. In almost all recording situations that included a dynamic lead vocal, compression was definitely necessary to achieve a high quality recording that would be easy to work with in the final mix without the potential fear of distortion and noticeable tape hiss.
Now with high quality DAW’s with their excellent dynamic range capabilities, the need to use compression in the recording stage is not mandatory and rarely used these days, with the engineer now having the flexibility to use and change the type of compression in the monitor and final mixing stages.
Basic Review of Functions
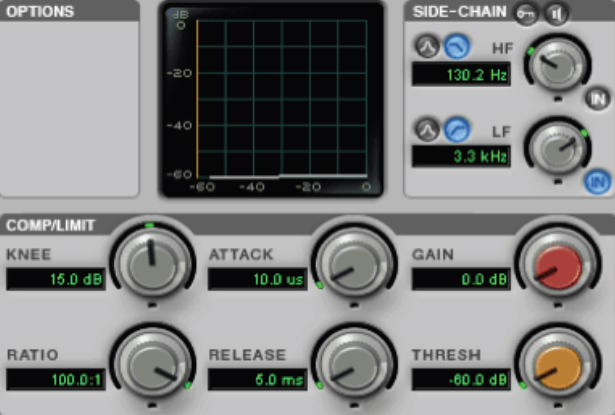
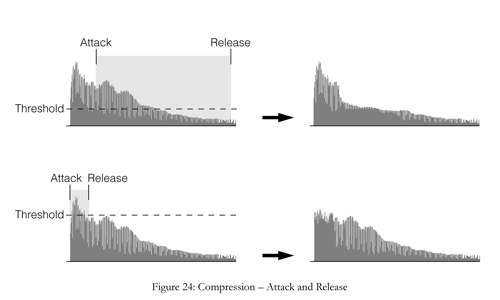
The attack time determines how long the compressor takes to reduce the gain once the input signal has passed the threshold point, while the release time determines how long the signal takes to return to normal-unity gain after the input signal has fallen back below the threshold point. Because compressors work by reducing level, most models have an output control called “gain make up”.
This control is simply used to restore the peak level of the compressed output signal to that of the uncompressed input signal.
Unity Gain
Setting a compressor to unity gain is extremely important. I have often ventured into a studio only to discover that all the compressors and their settings are all over the place. Either the assistant from a previous session did not flattened the board’s compressors and/or reset all the outboard compressors back to unity gain. For example, unity gain is a setting where if the engineer inserted a compressor over a channel there will be no noticeable output gain change or gain reduction if the compressor is activated or is in the “bypass” mode. If the previous engineer had set the output gain to a very high output level for the purpose of extra amplification, and then the compressor is inserted over a live vocal, the vocalist and I would most likely experience painful feedback that could leave our ears ringing for days, because of the huge gain change in the output that had been set by the previous engineer.
Aligning For Unity Gain
For unity gain, take an oscillator and insert it in a channel in “line input” mode (Dim the monitors). Then set the fader output level so the master fader reads 0-VU. Now set the input meter on the compressor to 0-VU with the input level control on the compressor.
If you cannot measure input control level on the compressor than set it to where the first sign of gain reduction is being displayed (Ratio 4:1). Now set the output level on the compressor to 0-VU. If there is no outboard metering function on the compressor, then use an external metering system to set the output to 0-VU. If the compressor is setup this way, you will not notice an audio gain change when placing the compressor over an insert.
So before you start a session, remember to reset all outboard gear, especially compressors to unity gain and maybe pencil mark the settings on the actual compressor’s unity gain setting.
Input-Gain Reduction
The input control, determines how much level is being sent to the first stage of audio compression. With some compressors (LA-2 & 1176) the input control also acts as the threshold function, the higher you turn the input level up, the more the signal is compressed.
If the compression ratio is set to 4:1, set the input level so the signal to the compressor should peak at -4VU at the maximum amount of compression. If the Ratio is 2:1, the maximum reading of gain reduction should be -2VU. Remember that too much gain in the input stage could introduce distortion and not enough gain will cause increases in the amplification stage of the compressor’s output, adding unnecessary noise to the signal, especially if it’s an old tube compressor.
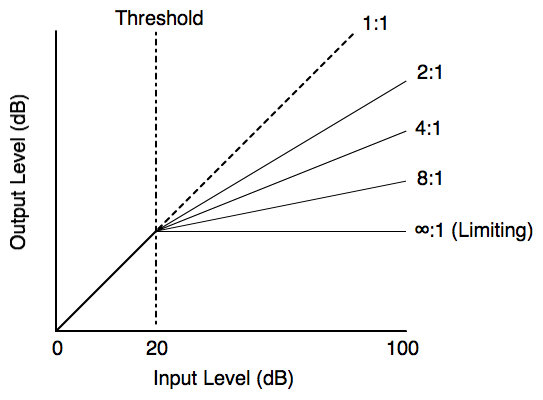
Compression Ratio
The decision on what ratio to use is determined by the dynamics of the signal and how much the engineer wants to compress. I often view ratios between 2:1 and 6:1 as optimum compression ratios. When working with a vocalist, start with a ratio of 3:1 and set the threshold so you are seeing maximum gain reduction of -3db. Then listen to the vocal in the mix and see if it is sounding the way you want it too. The compressed sound should still have dynamics but it should be easier to hear the lower melody parts and words. If you are finding it difficult to hear some of the lower levels and you than need more compression, so increase the ratio but do not lower the threshold! Lowering the threshold would be a huge mistake. For example what happens when you lower the threshold of a ratio set to 3:1, is that you will see the vocal’s gain reduction moving between -3db and -6db. In this situation, all you are doing is turning the overall level of the vocal down and generating undesirable compression artifacts in the sound.
Instead, increase the ratio to 6:1; lower the threshold to where there is approximately -6db of gain reduction with the meter returning to 0- VU-gain reduction on the softer vocal parts. The optimum goal when compressing is to have the gain reduction meter returning to 0-VU of gain reduction on a regular basis.
It’s vital that you listen carefully to the processed compressed signal to see if it sounds the way you intended it to sound, for meters can only tell you so much. As a rule, a hard-knee compressor will give the most positive results in situations where the signal is in need of assertive compression. If all you need is a little compression, experiment with a soft knee.
If the compression starts to sound too squashed, you’ll almost certainly need to reduce the ratio, raise the threshold or lengthen the compressor’s attack time. There are some compressors that don’t produce a linear response above a set threshold, and it’s not uncommon for the amount of gain reduction to either lower or even increase when substantial compression is being done. In effect, this means that at very high signal levels the compression ratio tends to either increase or more commonly, decrease.
Threshold
One use of compression is for controlling loud peaks in a performance. If the engineer wants to reduce these peaks without affecting the entire dynamic range of the rest of the performance, the usual approach is to set a threshold that’s just above the average level with a compression ratio between 5:1 and 8:1 and with a fast attack time. This way only the peaks are subjected to gain reduction and are considerably reduced.
If you want to apply modest compression than select a ratio between 2:1 and 4:1 and lower the threshold and lengthen the attack time (slower). This is a good starting point to even out dynamics of a performance so it can reside at a suitable level where it is easily heard all the time during the performance. This works well with instruments like bass, guitars and vocals, where the engineer desires to slightly squeeze the dynamic performance and then find a balance level that is suitably audible in the mix.
If the engineer feels the instrument is still jumping out in the mix, than all he has to do is lower the threshold and maybe shorten the attack time (faster), so the louder parts of the performance are compressed more.
So to conclude, the threshold is preset point where all audio above the threshold gets compressed by a ratio determined by the engineer. The attack time setting directly influences the threshold point.
Attack Time
The attack time is a setting that tells the compressor to activate after it passes a preset threshold point.
With transient signals are needed to be compressed, than faster attack times are required. When peak limiting is needed to prevent distortion, super fast attack (less than 1msec) times are utilized. Slower attack times (greater than 10msec) are required for audio that is more RMS in nature, like a bass guitar played with fingers. One has to be aware that fast attack times can choke the sound and where slow attack times will at times give the impression that the compressor might not be operational.
If an attack time of 25msec is selected, than what that indicates is that the signal will not start to be compressed until 25msec after the preset threshold level has been crossed. It is always a minor dilemma for engineers where a situation requires an appropriate attack time with the appropriate compression ratio. When the engineer wants basic level compression for an instrument to sound balanced in a mix, he has to decide how to marry the right attack time with the right compression ratio (and to a certain degree the threshold). This choice between the two parameters is influenced by the transient nature of the audio waveform and how much compression is desired. For example, an electric guitar played with a thick pick would most likely require a faster attack time than a bass guitar played with fingers. A loudly played piano would require a faster attack time than a B3 organ. To control occasional snare drum hits, than a super fast attack time is needed.
Release Time
This is the time it takes for the signal to return to its original level after the signal has crossed the threshold on the downward part of the audio envelope.
The release time setting is usually determined by the engineer, or with compressors that have an auto-release setting. The DBX compressor has an Auto-Release function, which does the job for you and works well for lead vocalists. To prevent half cycle-distortion, longer release times may be required for instruments that contain a lot of low frequency content. Short release times are often desired but may produce undesirable pumping and breathing effects. On occasions there will be an instrument that has a lot of audio content in the sustain part of the audio waveform, which generates a lot of resonance and would require medium to long release times. If the same instrument has random peaks within the sustain portion than longer release times are required as to avoid the sound from pumping in volume when it is sustaining or decaying.
The “Knee”
Another concept to explore is that of the ‘knee’ function. A basic compressor does nothing to the input signal until it reaches the threshold, then the full amount of gain reduction is applied as fast as the attack time will let it. This is good for assertive level control, but can be a little too obvious when a lot of compression is being applied to critical sounds within a mix like a lead vocal. A gentler-sounding compression can be achieved by using a so-called soft-knee compressor, where the compression ratio increases gradually as the signal approaches the threshold. Once the signal passes the threshold, the full ratio as set by the user is applied, because some compression is applied to signals approaching the threshold, the transition from no gain reduction to full gain reduction is far smoother. Since some compression is applied to signals approaching the threshold, the transition from no gain reduction to full gain reduction is far smoother for it takes longer to achieve the full compression ratio value.
An engineer will often wonder why he doesn’t use soft-knee compression all the time for it is incredibly smooth and transparent sounding. In certain situations it’s nice to use compression as an effect, in which case relatively hard and quick compression tends to work the best. A little deliberate gain change can give the impression of loudness and hard-knee compressors can pump more quickly than soft-knee types.
Also at higher ratio settings, the hard-knee compressor provides definite gain control, so if a signal is varying in level to an excessive degree, a soft-knee compressor might not produce the required degree of amplitude leveling. The choice of which to use has to be made by ear, especially as every soft knee compressor behaves differently. Soft-knee compression usually provides the smoothest compression and use low ratios, but hard-knee models give tighter control and may be better for creating dramatic compression effects.
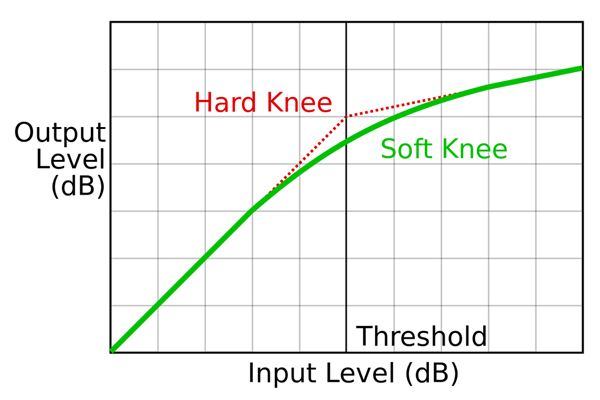
Hard Knee and Soft Knee Compression

The Audio Waveform Elements of Amplitude
Creating a Rhythmic Idea
If you look at the above diagram you will notice there are 4 sections approximating the duration of an audio signal as measured in volume over time. For the above example I am going to use a piano chord hit.
In the A area, you have the attack of the hammers hitting the strings. This sound is percussive in nature and is basically composed of odd harmonic content ranging from approximately 2khz and above. If one could focus on just hearing only this part of the waveform it would sound almost like noise or even an attack sound on a percussive instrument. The same could be said if it was a guitar note plucked with a pick. This is the part of the waveform that defines the rhythm of the performance, there is hardly any musical content in this part of the waveform, for it is simply 2 hard objects coming into contact with each other, the piano hammer and the metallic string(s). In an editing session, if the first part of the attack of a note has been compromised then it can be easily replaced by another attack section form another note, for they are both basically the same percussive sound. When mixing a musical production and one of the instruments is performing a rhythmic role and is not clearly defined as a rhythmic idea than with a little bit of EQ and the right type of compression can easily enhance the rhythmic role of that performance.
You can enhance an instrument for a rhythmic role in your mix through compression by setting the attack time to “slow” on the compressor. Set the attack time between 30msec-80msec, for this will not affect the transient of the signal and will only compress the musical tonality and sustain of the instrument. If you look at the above diagram of the audio waveform, it is mainly the “C & D” sections of the waveform that will be compressed. Also have the release time set between fast and medium. The actual release time is dependent on the type of instrument and how fast the player is performing.
One way to focus on getting the attack-rhythmic element from a performance is to first set up a 10:1 ratio and have the gain reduction showing -6db of gain reduction with the attack time set to as fast as possible. With most DAW compressors this time can be set as fast microseconds. Play the performance and you will notice that it is being severely compressed all the time. Now slowly lengthen the attack time until you start to hear the transient coming through the compressor unaffected. As you slowly lengthen the time you will start to focus in on how much of the attack you want. From my experience I start to notice the transient coming through at 10msec. With a rhythmic piano or guitar I usually settle on an attack time between 30msec—60msec. It all depends on how chunky I want the attack of the performance to sound. Now at a little EQ between 2khz-4khz if it’s an electric guitar and a little EQ between 4khz-7khz if it’s a piano. Remember once you have the desired attack sound, fine tune the compression to the right ratio and gain reduction for the rhythmic idea you are trying to enhance.
Since the attack time is set to a slow setting, transients will pass through the compressor unaffected giving you a very percussive sound on the instrument.
This will work exceptionally if you want your drums to sound more punchy, the piano to sound like it was played harder and acoustic guitar strumming where you want to bring out the rhythm more. With this slow setting of the attack time, the engineer needs to make sure that the extreme peaks that last only a few milliseconds don’t overload the mix especially when it contains a drum performance.
If you are compressing the drums with a slow attack time to make them sound punchier, it would be wise idea to insert transparent limiting over a stereo sub-group channel with super-fast attack and super-fast release times in order to manage the occasional extreme amplitude peaks that might create distortion in the final mix or in digital transferring.
Audio Compression with Different Attack Times
Creating Sustain & Resonance
Looking at the Audio Waveform diagram from the B to the D point, we will notice a drop in amplitude. What also happens is a drop in high frequency response. As previously stated, most of the mid-range and high frequency range are contained in the A part of the waveform. Immediately following a piano chord hit, is the action of the strings starting to vibrate.
As the strings start to vibrate to high frequencies from the attack quickly fade and the resonant pitch of the strings start to vibrate producing a fundamental note and related harmonic structure notes. As the strings continue to vibrate the soundboard starts to resonate. How loud it resonates depends not only on how hard the chord is hit, but the physical size of the soundboard. If the soundboard is that of a grand piano it will be able to produce more volume of the basic fundamental note. If it is an upright piano, the fundamental note will still be produced but at a lower level compared to the volume of the related overtones (harmonics). This is indicated by the “C” section of the waveform. Most of the frequency content of the C part (sustain) is below 2khz (approx.).
In enhancing a musical and resonant performance, what I am conferring is how to augment the actual musical pitch, be it harmonic or melodic. The area in the audio waveform that establishes this is mainly the “C” section. Looking at the frequency content of the C-section, you will discover that there is not much frequency content above 2khz, with most of the content between 200hz and 2khz (approx.). There is very little frequency content above 2khz and if there is any it is usually pitch based on instruments like a piccolo, piano, violin…etc. Even the highest note of a soprano is just above 1khz.
So the strategy that needs to be employed to enhance a musical idea is to alter the dynamics of the audio waveform. If we know that most of the A-B sections contain frequencies above 2khz than that is the area that must come down in volume in relation to the C-section, where most of the frequency content is below 2khz.
So if we look at a melody being performed on piano we will need to compress the A section of the waveform.
If you move the attack time to approx. 1.0msec and with a medium- release time the instrument will sound more musical, for the sustain part of the waveform will now be much louder in comparison to the transient part. With a piano chord/single note hit, what you are basically doing is lowering the transient attack part of the waveform and leaving the sustain part unaffected. Then the engineer can raise the post-compression output to a louder level generating the idea that the piano chord hit has more musical content and duration than the original piano with the percussive content of the attack.
Establishing the volume relationship between the attack (rhythm) of the piano and the musical note resonance is determined by the compression ratio and how much compression is being used. Be aware of overdoing the compression for the attack part (rhythm) might be so low in amplitude that the performance starts to sound like it is behind the beat. Adding a little additional EQ in the 200hz-2khz range will additionally augment a musical note idea. Where you EQ in the 200hz-2khz range is determined by the actual range of notes being played. If the melody is around C4 than the EQ boost will be in the 800hz-1.2khz range. If the melody is around C2 than the EQ boost will be in the 400hz-800hz range. Remember to use a Q bandwidth of approx. 0.8-1.0.
So to conclude if you want an instrument to sound more musical and with more sustain and resonance, than compress the transient with a super-fast attack time and add EQ between the range 200hz -2khz. If you want the instrument to sound more rhythmic than compress the instrument with a slow attack time and EQ in the range of 2khz- 10khz.